Assisted alignment in 3D scanning
Posted by Philip Hanrahan B.E., B.A., M.I.E.I.; Oliver Murray on 24th Jun 2022
Scanning large, featureless spaces with a Pro2 3D camera can sometimes cause problems. Some issues that users report include error messages indicating that the camera simply cannot complete the scan. The most difficult areas are large expanses of building without features, or with recurring features. The Pro2 has nothing to reference, and the process of scanning can become fought.
Matterport users encounter problems in spaces like long featureless corridors, where the scans move off centre. Mislocated scans find the Pro2 putting the scan where it does not belong. For example, in buildings with multiple similar floors the scan may migrate to the apparently correct location, but on the wrong floor!
How to avoid misalignment when scanning large spaces?
There are a few tactics you can use to avoid issues when scanning large, empty spaces.
First thing to consider is preparing the space beforehand, strategically placing plants, fire-extinguishers, chairs, litter bins and other items around the space.
Doing a matrix of scans within six feet or so of each other can also stabilise matters and allow the scanning to proceed without drama.
The most efficient way, though, is to use the Assisted Alignment feature in the Matterport Capture App. This setting, when used in conjunction with special targets called April Tags, gives the Pro 2 reference points, so it can scan at greater distances.

What is Assisted Alignment?
Assisted Alignment is a feature that makes it easier to scan places with empty or repetitive architecture and is particularly useful for Architectural Engineering and Construction (AEC) practitioners.
It works very well in large, open, empty spaces such as factories, commercial real estate, schools, hotels, shopping and conference centres. Also, long uniform hallways, evenly spaced columns, and other repeating architecture.
How does the Assisted Alignment work?
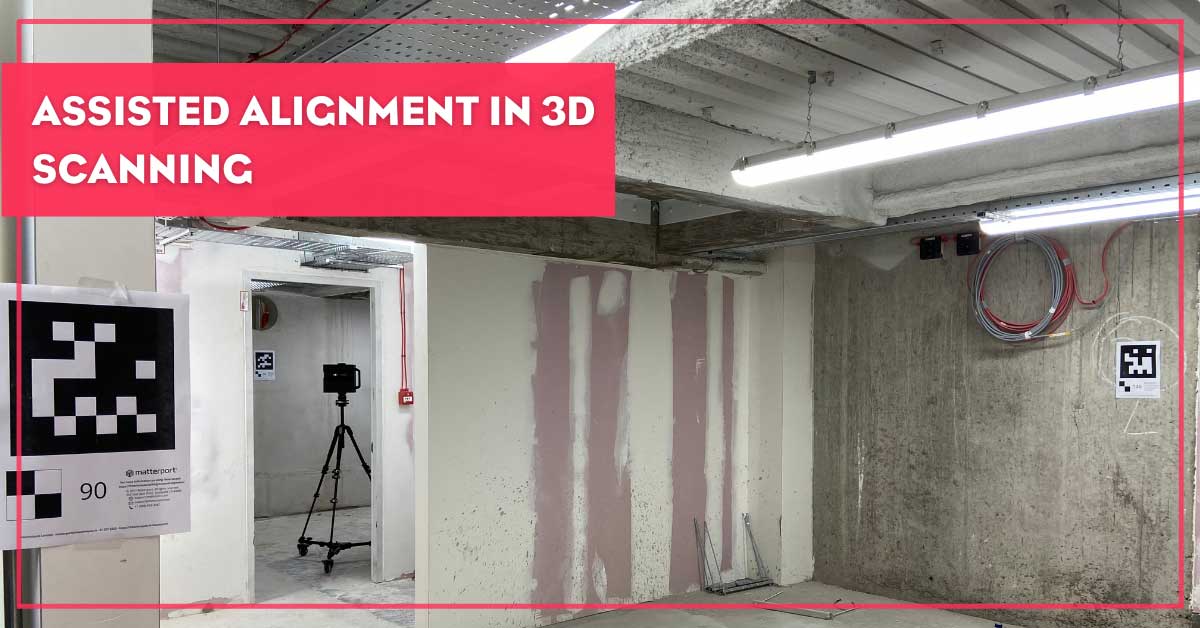
The lack of 3D data or the fact that a new scan was too much like a previous scan can often lead to misalignments and alignment errors. Assisted Alignment uses April Tags which are A4 targets placed at key locations on the site at eye-level. The Capture app uses these targets to place the scan in roughly the correct location and then uses depth information to fine-tune the alignment.
Assisted Alignment does not eliminate the possibility of misalignments, so it's still very important to check that each scan appears in the correct spot at the time of scanning.
You need to consider that the targets can’t be removed from the final model, so this method is not ideal where the model is to be used in marketing. You can use the blur function to obscure the targets in the processed model. If your goal is to make the space available publicly for marketing purposes, then you may consider using plants, small bits of furniture, etc.

Step-by-step Guide to using Assisted Alignment in the Matterport Capture App
Instruction on preparing for scanning and using the Assisted Alignment feature.
Illustrations courtesy of Bennett Construction are from the capture of a Penneys (Primark) 5,500 sq m retail space during refurbishment.
- Before scanning, estimate the number of target-sets you need. This will depend on the size of the space you’re scanning and its characteristics. Tags may be placed at 30ft/9m intervals. If you have floor plans you can estimate the final number of targets otherwise you may need to carry out a site visit in advance of the capture.
- You can get 4 sets of April Tags (Targets) from our Downloads page.
- There are 50 targets in each set, numbered 1-50, 51-100, 101-150, and 151-200.
- Each target can only be used once in any model, so print out enough sets to cover each complete project.
- These targets are based on April Tags from the APRIL Lab at the University of Michigan. Targets from other systems or companies will not work with Matterport.
- Print out the targets on A4 paper. Disable ‘Fit to Page’ setting.
- Allow for some more than you estimate you need.
- Tape the targets at key locations on the site at eye-level, spaced about 30 feet / 9 meters apart. Tape all four corners so there is no possibility of movement.
- If required targets can be taped to the floor, but vertical is better.
- If there are pillars, place the targets so that they are on the surface parallel with the direction of travel between scans.
- These targets should then be visible in the next line of scanning.
- Targets can be placed and scanned in any order.
- You cannot reuse or move targets once they are placed, and may have been recorded in a scan.
- Turn on Assisted Alignment in the Capture App.
- Select the "More" button at the top-left of the screen.
- Choose "Settings & Privacy".
- Switch "Assisted Alignment" on.
- Scan about 15 feet / 4.5 meters from the nearest targets.
- Ensure you have a direct line-of-sight to the previous scan and marker.
- Scan in an organised manner, using a grid pattern where possible.
- Consider scanning inside the perimeter of large open spaces to begin with as this should result in a strong frame.
- If you are scanning at 30ft/9m intervals add an additional scan between the end scans in every row.
- In long corridors, watch out for possible misalignment as you scan, and add additional off-centre scans where there are distinctive features like recesses, stairwells etc.
What do you need to remember?
Using Assisted Alignment reduces the number of scans required and the time taken to complete the capture of buildings that are featureless or have repeating architectural features. It will add two to three seconds to your scan times, though.
Using targets combined with a methodological approach should mean the accuracy of the model is not compromised, rather it is enhanced.
Targets must not be recycled within any one model, but they can be reused on a new, separate model.
The targets will appear in the final model as they cannot be ‘Photoshopped’, although they can be blurred.
Final Outcome
Overall the number of scans may be reduced by up to 60% and the time taken to scan, including placing the targets, may be reduced by 50% or more once you get more familiar with the process.